Following on from a post over at Tabletop-Terrain about making roads with self-adhesive floor-tiles, I swung by the Home Depot (gotta love that 10% veteran’s discount) and picked up a sample of this shit – TrafficMaster “light brown travertine” SA vinyl. Given that it’s running less than $1/square foot, and each square foot makes two 12″x6″ road sections, this is going to be a about half the price of my previous favorite option – Ikea “Avskild” cork placemats.
Before I break down the advantages of each, I figured I’d put up a quick shot to show you the texture of the vinyl tiles versus the cork.
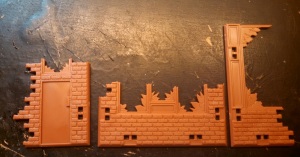
• Ikea Cork sheeting, painted as concrete (from the Airbase Toblerone project).
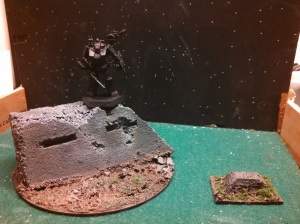
As you can see, it’s got a pretty fine texture, even on the smaller bunker. Good for concrete, but it’s not really my favorite on the asphalt front. The surface tearing is nice and chunky, and the edges wear pretty well.
Unfortunately, I don’t have any pics of the commissioned road set I did a few years ago, but we’ll go over my experience with them below.
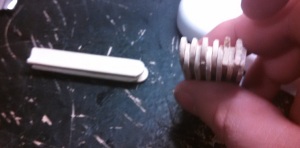
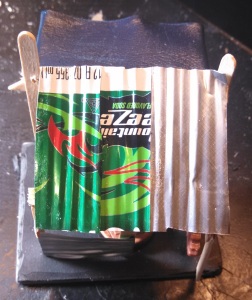
•Trafficmaster tile, inked and uncut (I just slapped some India ink on with a wet rag and took a photo here without cleaning the tile first: the pale spots appear to be greasy areas from previous handling..).
 Here we’ve got a much more irregular surface, and it’s already very reminiscent of weathered asphalt even with the pale spots and brown undertone. It is, however, a thin sheet of plastic – less than .25mm – laid over a ~1.5mm rubber sheet. That may make larger areas of surface damage look less realistic unless I cut out the undersurface and hammer the surface plastic down into the “damage” pattern, or fill them with basing ballast.
So, what’s my take so far?
Cork sheeting
Advantages –
Realistic surface damage (for both asphalt and concrete). It’s easy to sink in some paper clip wire to simulate rebar on a broken section, or a small piece of low-gauge copper cable/plastic pipe for other conduits, which dresses up the edges nicely.
Multi-purpose. Crumbled scrap bits make great rubble. You can face a chunk of foamcore or stiff card with the cork and get a plastered concrete surface in minutes – one that’s also easy to trash and make look good.
Super-easy to work. Cutting, fitting, and weathering the cork bits for both of the pieces in the pic above took me about two minutes.
Cheap. Granted, both of the materials have that going for them, but it bears repeating; this stuff costs about 75c/ft^2. In other formats, unfortunately, that’s not so true – a straight-up roll of cork from a craft or art store can be more along the lines of $5/ft^2. And there’s a certain amount of wasted material because of the rounded edges of the Ikea stuff and the weird size.
Disadvantages –
Poor surface sealing coupled with moisture sensitivity. You have to paint PVA or another sealant onto cork, or it has a nasty tendency to swell. That flakes off paint. It also behaves oddly when painted unless you seal it – soaking in some colors, repelling others, and generally being a pain in the ass. Plus, again, it can swell or crumble without sealant while you’re painting it, screwing up your effects or damaging the piece.
Fragility – the same thing that makes it easy to work makes it hard to store. Cork works best as a facing on top of another material, like heavy card or styrofoam. In storage, dropping or bumping the container can shatter off a large chunk of cork, and the pieces frotting against each other in the box will not just wear the paint but tear chunks out. That means you need padded storage and rigid containment, which reduces the amount of stuff you can store in a given space. With roads it’s less of a problem – you can wrap them in cheap felt and glue a sheet of craft foam to the edges of the box – but storing a large building is a >massive< pain in the ass
It just doesn’t look like asphalt at larger scales. With a good paintjob, you can pass it off pretty well at 6-10mm, and I’ve seen some guys make 15mm look decent, but at 28+ it looks like shit unless you work it as concrete. How many cities or highways do you know of that use concrete for the roads? Yeah. It’s fine for sidewalks and warehouse floors, but not roads.
Vinyl Tile
Advantages –
Tough as hell. I did a few experiments with a painted chunk, slapping it edge-on against a desk and flapping the piece back and forth. Paint held well, and even the section I stripped the vinyl from seemed to be doing okay. Unfortunately, rubbing the painted sides together did do some paint damage, so I’ll still need surface protection, but rubbing gently with stiff, sealed card didn’t do too much damage. I think I may be able to get away with just peeling and sticking the flooring sheets onto posterboard and using that as layer protection; for more on that, see “conclusions” below.
Great surface texture. I mean, look at that pic again. That’s literally a thirty-second swipe of india ink – not a damn lick of paint – and it already looks like a road.
The sheets are a better shape and size than the Ikea mats I’ve been using, which means there’s less waste. Basically with cork I got two 6″x16″ chunks of straight road, or two 12″x8″ sections. Lots of room for a shoulder, but the roads also wound up looking unrealistically wide compared to 1:43 or 1:48 cars (let alone the figs). Of course, I could trim off that extra couple inches on each side and use to make sidewalks and curbs or building parts, which was pretty cool. With the vinyl I get four 6″x12″ straights, nearly quadrupling the yield per dollar spent.
On that note, the sheets are even cheaper than cork, especially in bulk; I can get ten 1’x2′ sheets for under twenty bucks. So for the same $20 I can get either ten sections of road with sidewalks/shoulders, plus 2 intersections per road section I drop, or forty sections without sidewalks. Sections that require less reinforcement and storage area.
Properly painted, it also looks like facing stones. With a little work, it’d be great for adding a “sandstone” texture to the lower floors of Foamcore ruins, which means I still have an outlet for scraps. Cork does have an advantage, though, in that crumbled bits of cork will look great just tossed on a rubble pile, where this will require trimmed and (roughly) squared sections of the scrap rather than “whatever’s left”
Disadvantages –
Heavier, by a substantial margin. Each sheet weighs about half again as much as one of the placemats, making it harder to transport on foot/bus.
Harder to weather and simulate surface damage – as I mentioned above, just picking the surface off reveals a chunk of rubber, which has a terrible texture. So you have to backfill the holes with basing ballast, or find some other way of getting an interesting texture instead of smooth cuts. That adds working time as well, which seems to be compensating for not needing to seal each individual piece.
Harder to work – This shit is dulling the HELL out of my boxcutter, and straight-up snapped a #11 Exacto blade within 5 cuts. It’s also tearing the shit out of my leatherworking swivel knife, which is why the boxcutter is getting an outing. I also can’t slap it up on the deck of my paper-cutter to just slice off straight sections, which means breaking out the rulers, square, and compass.
Floppy – A disadvantage both share, but the higher weight of the sheeting makes it more noticeable. I’m gonna need to give these a stiffer backing to keep the paint on, even if it held reasonably well in the basic tests.
Surprise contestant:
EVA (Craft) Foam
Advantages:
Easy to work, soft, multi-purpose.
Disadvantages:
Poor surface texture, floppy, fragile, and more expensive than either. Worse, it’s sensitive to heat and to spraypaint, so it’ll need sealing.
ConclusionsI’ll definitely keep using cork for my own street/postapoc projects, but I’m about to add a lot more vinyl to my toolbox. Given the properties of both, I’m thinking of using an 8″ wide strip of black posterboard, with the vinyl laid on top (using its own adhesive) as a road bed and either cork sidewalks or ballast to simulate gravel shoulders. I could also take strips of foamcore and cut out roadbeds from the center ( just leaving the bottom layer of card), and mark up curbs/sidewalks onto the raised edge sections. The foamcore method is almost certainly going to be the way to go if I’m making bridges/overpasses, unless I can convince that guy in the Makerspace to let me use his laser cutter on some MDF or hork up for the Hirst Arts bridge mold..