I picked up the Mars Attacks! brick ruin terrain boxed set a year or so ago, while I was on my last Fallout kick. The sci-fi kits they put out were pretty cool, and I liked the way those fit together, so I snagged a couple of the MA! ruins boxes on sale from the LGS, hoping they’d fit the good old zeerusty Fallout aesthetic. They were.. not the most impressive. A couple of connectors snapped off while I was doing test fitting, and there were a huge number of “samey” pieces of ruin. That tends to make everything look a little too planned for a crumbling town (in particular, the three identical un-shattered glass doors, and all the identically-busted windows). The clip-together system also leaves huge unsightly gaps between pieces, and glaring holes in the models’ texture that would require filling. Plus they were a garish salmon-orange-pink. So I knew that if I put these together I’d either hate them or have to give up on the modularity that was supposed to be the kit’s selling point.
Instead of doing either, I got annoyed with it in the planning stage and stashed it in the back of my closet with the rest of my unloved but usable gaming crap.
Today I’ve been inspired by the work of the gent over on Tabletop Terrain to give my 20th-C brick a second look (he’s got a couple of really cool posts through that link showing his own work on it). He fixed the gapping problems and the clip-holes quite handily. As I said, however, the biggest thing that bugged me personally was the uniformity of the busted bits, along with how small most of the pieces are. Some are barely big enough to make a blasted corner sticking up out of the rubble, and only have 1-2 clip holes. That makes building walls and linear terrain much harder. Plus, I want a couple of vaguely intact buildings to fuck about in. The best part about Necromunda and Mordheim was always the massive, multi-level terrainscape; I want to get some of that feel with my own This is Not a Test tables. I know Mantic offers actual un-ruined sets, but most of them don’t actually give me anything over what I already have. In particular, the roof tiles look shit and they have no models with plain, open windows – everything’s a thin layer of tough, orange plastic I’d have to saw out anyway. I might pick up their Convenience Store for the windows, but really their setup is pretty janky and this is more about salvaging and getting the most out of what I have. Kinda appropriate for a post-apocalyptic project, if you think about it..
So I set about restoring what bits I have and planning out new ones – the roofs are going to have to wait for a bit.
One of the first things I noticed was that the “Accessories” sprue has some pretty cool bits on it that aren’t actually on any of the buildings Mantic offers – a different dustbin, beer kegs, a better-looking paneled door – so I plan to might wind up separating a few of those off and repairing/recasting them for scatter terrain. That door is >definitely< going under rubber, although I’m going to have to make it as a “face” mold since the other side is covered by crates and reinforcements.
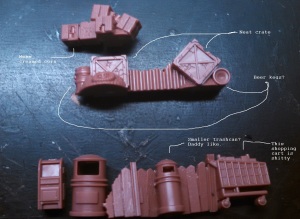
Annotated to show some of the nifty salvageable bits here

Almost the same size, and you can’t tell me this isn’t cooler…
The park benches are too difficult to cast, and I can make my own, better-looking ones more quickly and cheaply with coffee stirrers and wire anyway, but the road signs and 50s-style lamps are badass.
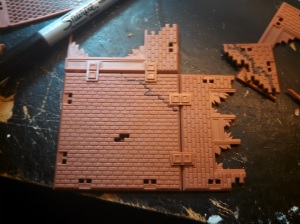
I also did a basic repair on the main panel.
I had the sneaking suspicion that one of the smaller “ruin” pieces would match up fairly closely to the missing chunks of the largest panel. None of them did exactly, but a couple were pretty close. This was the best fit.

I traced the outline of the larger wall on it with a sharpie and got to work with the ol’ razor saw (this stuff is a little too stiff to cut with the X-acto, although my heavy boxcutter is decent for trimming), and an emery board.

These things are the shit, kids. $1.50 for fifteen, and they’re wide, straight, flat, and flexible.
Anyway, I sanded until the model hit a decent temporary fit, then clamped it into a pair of other walls as an alignment jig and sanded until it fit cleanly and without real effort before I glued it. I also lightly sanded the surface of the piece – like a lot of these hard-plastic wargaming models, it warped slightly while cooling and I want the recasts to be as clean as possible.
 Next up is making a quick-and-dirty epoxy mold to transfer and repair the brick texture from the other side and replace the two bricks in the middle.
After that I have a couple of ideas, but given how shitty this plastic is to work with I think I may just cast up quick-and-shitty molds of the main unique wall sections instead of building off of what I have.
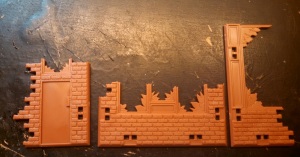
Said larger bits of ruin
One of the cooler things is that the door piece aligns in a couple of different ways with the window-walls. With proper castings and a little elbow grease these ought to break up a lot of the monotony of the set.

Side alignment with two full-height windows
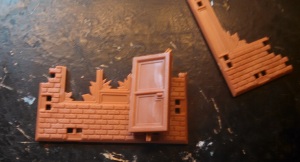
Side alignment with the paneled door
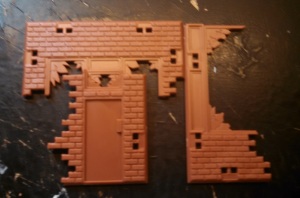
Center alignment with two small windows above the door.
The bay window will be kind of a bitch, but at least I can get my brownstone on in a reasonably attractive manner. Floors will be super easy, just joisted coffee stirrers with a little filler on top, and I think can get away with using the floor separators as a frame to hold on upper levels since I’m not going to be using the Mantic clips to hold the structures together. Given my ongoing mold hold-out rates, this ought to give me enough casts for a couple reasonably-sized buildings to play in and beat the shit out of in a slightly less-regular manner than they probably intended.